

Architectural Aluminium Extrusion
ALUMINIUM CLADDING INSTALLATION GUIDE
Official structural planning, preparation, rules and step-by-step layout assembly system for Intelligent Aluminium Cladding (IAC) systems.
Before You Start
Prior to installing any intelligent aluminium cladding system, it is recommended that you check with local building codes for any special requirements or restrictions. The designs and instructions outlined in this guide are for illustration purposes only and are not meant or implied to replace a licensed professional. Any construction or use of intelligent aluminium cladding hardware should be in accordance with all local zoning and/or building codes. The installer assumes all risk and liability associated with the construction and use of this product.
Safety First
When dealing with any type of construction project, it is necessary to wear appropriate safety equipment to avoid any risk of injury. When handling, carrying and installing the following safety equipment is recommended: hard hat, safety glasses, gloves, protective footwear, protective clothing and fall protection equipment when required.
Required Tools
Standard carpentry tools are required for a successful assembly. Power tools, hand tools and measuring equipment may be required depending on the specific installation.
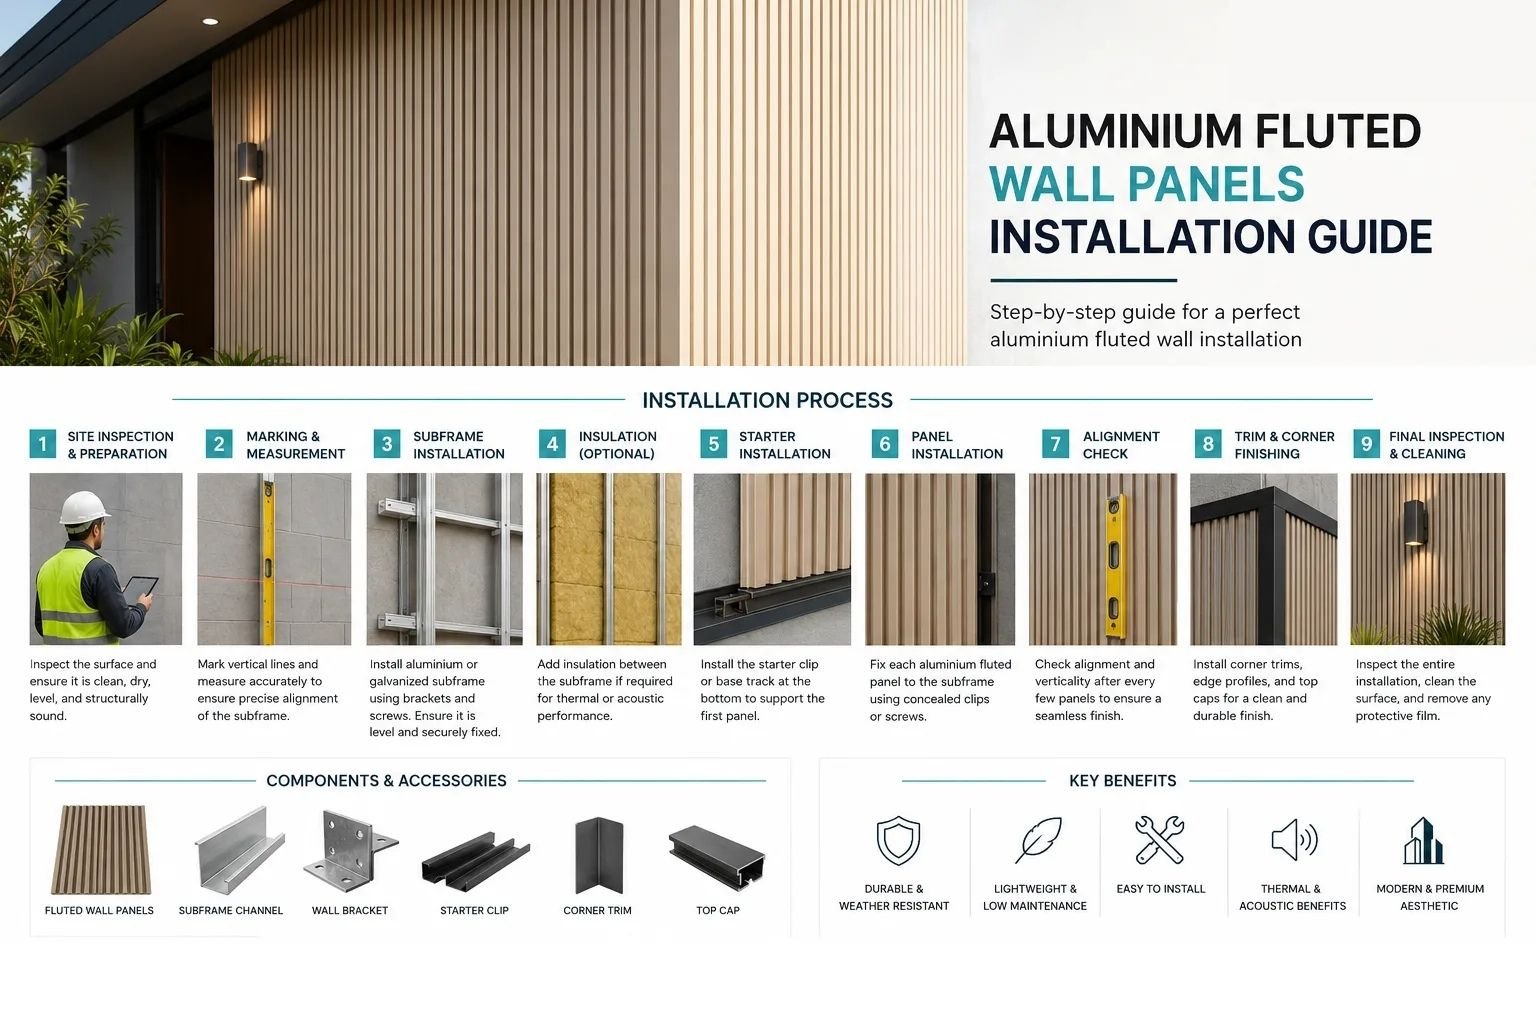
Installation Process
Prepare the installation area and verify site conditions.
Measure the required dimensions and mark the fixing points.
Install the required supporting framework securely.
Position and fix aluminium panels according to the layout.
Check the complete installation for proper alignment.
Inspect all connections and complete the installation.
Components & Accessories
Site Environment & Work Planning
A clean, smooth, flat and strong surface is needed to install IAC products correctly. Please check with local building codes before installing any type of wall cladding. If the installation does not meet local requirements, the IAC product should not be installed until the required site conditions have been achieved.
Always follow the approved product specifications, installation instructions and applicable local building regulations before beginning installation.
Site Environment &
Work Planning
A complete guide to planning, preparing and installing architectural wall cladding correctly and safely.
A clean, smooth, flat and strong surface is needed to install AC products correctly. Please check with local building codes before installing any type of wall cladding.
Plan the layout before starting the installation to ensure the best possible looking wall cladding for your project. Building codes and roofing ordinances generally apply to penetrations, openings and mounting systems.
We recommend drawing out a site plan of your proposed project so you can minimize waste and achieve a professional finished appearance.
Important Installation Warning
AC products are NOT intended for use as structural, support or framing components. They must be installed over a code-compliant substrate.
Rear Ventilation Mandates
Maintain adequate airflow behind the cladding system.
Continuous Ventilation
AC products cannot be directly installed onto a flat surface. They must be installed over a substructure that allows adequate and unobstructed airflow beneath the cladding.
- Maintain a continuous rear ventilation cavity.
- Allow moisture to drain and dry naturally.
- Provide ventilation along the full wall surface.
Step-by-Step Installation
Follow each stage carefully for a clean and durable finish.
Substructure Joist Layout
Before installation, make sure the wall surface is smooth, clean and dry. It is highly recommended to use joists engineered from aluminum.
Fix the aluminum joists securely to the base wall structure. The spacing between joists should be carefully planned according to the cladding system requirements.
Substructure Framing Clearances
Maintain adequate clearance around the joist and structural framing so the cladding system can ventilate and perform correctly.
- Allow adequate space between joists.
- Maintain clearance between structural framing and joist edges.
- Keep the ventilation cavity unobstructed.
Cladding Board Mounting
Position the first piece of architectural wall cladding over the structural framework joist, then fix it firmly to the joist using fastening screws.
Connect the second interlocking piece of cladding into the groove profile of the first panel.
Continue the wall profile installation by repeating the sequence across the wall surface.
Fastener Recommendations
Use high-grade stainless-steel screws suitable for the selected panel and supporting substrate.
Screw length must be carefully selected according to the depth and wall thickness of the structural joist.
- Never drill or screw directly through the visible face of the cladding panel.
- Maintain the manufacturer's recommended edge clearances.
- Allow sufficient movement space between adjoining panels for thermal expansion.
- Maintain an appropriate minimum seam gap between adjoining cladding boards.
Corner & Trim Profiling
When working around corners, cut the individual cladding boards accurately to the required dimensions and secure them correctly to the profile channel.
Install the corresponding corner component over the adjacent wall panel and ensure the finished surface remains properly aligned.
Universal corner trims can be used to finish vertical corners and provide a clean, professional appearance.
Windows & Doors Framing Integration
Important considerations around openings and frames.
1. Main Panel Cut
When working around openings, carefully measure the required panel length and width so the panel fits accurately around the window or door opening.
2. Window Sills
For windows with structural framing, cut the selected window sill component to an accurate running length so that it fits correctly around the opening.
3. Waterproof Seal Application
Apply appropriate waterproofing and sealing around the opening to prevent moisture penetration behind the cladding system.
4. Mitre Cut Finish
For vertical corners around window frames or doors, use an appropriate corner profile and create a clean mitre cut for a professional finished edge.
Opening Clearance
Maintain an appropriate clearance between window and door openings and the edge of the cladding profile. Always verify dimensions against the manufacturer's installation requirements.
Professional Installation Starts With Proper Planning
Follow the recommended substrate, ventilation, fastening, clearance and finishing requirements to achieve a durable, clean and attractive architectural cladding installation.